Implementing Voice Recognition in Swift with OpenAI
Now is the perfect time to integrate AI and transform your mobile products with powerful tools — in our case, voice recognition.
Booting Up
AI has revolutionized how we interact with our devices, and voice recognition is one of the most accessible solution for this technology. In this article, I’ll guide you through creating an interface for audio recognition and transcription using OpenAI’s tools. This is just the beginning — in future series, I’ll explore other creative approaches, such as transforming input into custom data models like graphs or visual structures. For now, let’s dive into the essentials of audio-to-text conversion.
Prerequisites
Adding Privacy — Microphone Usage Description to Info.plist
Building the Core Managers
SpeechManager
The first step is developing a central manager, which orchestrates audio capturing and transformation. It acts as the nucleus, coordinating smaller managers to maintain a clean and modular design.
Start by defining an enum to represent the current voice state. This enum will help track whether the system is idle, recording, or processing audio.
enum VoiceState {
    case idle
    case recording
    case processing
    case returning
    case error(Error)
}
By isolating responsibilities into smaller managers, we ensure the system remains scalable and easier to maintain.
import AVFoundation
import OpenAI
import Combine

class SpeechManager: ObservableObject {
    private let audioRecorder: AudioRecorderManager
    private let transcriptionManager: TranscriptionManager

    @Published var state: RecorderState = .idle
    @Published var transcription: String?
    @Published var errorMessage: String?

    init(audioRecorder: AudioRecorderManager, transcriptionManager: TranscriptionManager) {
        self.audioRecorder = audioRecorder
        self.transcriptionManager = transcriptionManager
        self.audioRecorder.delegate = self
    }

    // Switch voice state to recording and activate audio manager
    func startRecording() {
        do {
            try audioRecorder.startRecording()
            state = .recording
        } catch {
            handleError(error)
        }
    }

    func stopRecording() {
        audioRecorder.stopRecording()
        state = .processing
    }

    // Once voice is stored in dedicated file we need to terminate the audio session
    func processRecording() {
        guard let audioData = audioRecorder.getAudioData() else {
            handleError(NSError(domain: "SpeechManager", code: -1, userInfo: [NSLocalizedDescriptionKey: "Audio data not available"]))
            return
        }

        transcriptionManager.transcribe(audioData: audioData) { [weak self] result in
            DispatchQueue.main.async {
                switch result {
                case .success(let text):
                    self?.transcription = text
                    self?.state = .idle
                case .failure(let error):
                    self?.handleError(error)
                }
            }
        }

        audioRecorder.deleteAudio()
    }

    private func handleError(_ error: Error) {
        errorMessage = error.localizedDescription
        state = .error
    }
}

extension SpeechManager: AudioRecorderDelegate {
    func didFinishRecording(audioURL: URL) {
        processRecording()
    }

    func didFailRecording(with error: Error) {
        handleError(error)
    }
}
AudioRecorderManager
This manager handles everything related to audio recording and storage. Its primary tasks include:
Starting and stopping the recording.
Converting the recorded audio into Data.
Managing cleanup by deleting the local file after processing to avoid clutter.
This manager ensures that the recorded audio is efficiently prepared for transcription while maintaining a lean storage footprint.
import AVFoundation

class AudioRecorderManager: NSObject {
    private var audioRecorder: AVAudioRecorder?
    private let audioFileName = "audioRecording.m4a"
    private let audioFileURL: URL = {
        FileManager.default.temporaryDirectory.appendingPathComponent("audioRecording.m4a")
    }()

    weak var delegate: AudioRecorderDelegate?

    func startRecording() throws {
        guard audioRecorder == nil else { throw NSError(domain: "AudioRecorder", code: -1, userInfo: [NSLocalizedDescriptionKey: "Already recording"]) }

        let audioSession = AVAudioSession.sharedInstance()
        try audioSession.setCategory(.playAndRecord, mode: .default, options: [.defaultToSpeaker, .allowBluetooth])
        try audioSession.setActive(true, options: .notifyOthersOnDeactivation)

        let settings: [String: Any] = [
            AVFormatIDKey: Int(kAudioFormatMPEG4AAC),
            AVSampleRateKey: 12000,
            AVNumberOfChannelsKey: 1,
            AVEncoderAudioQualityKey: AVAudioQuality.high.rawValue
        ]

        audioRecorder = try AVAudioRecorder(url: audioFileURL, settings: settings)
        audioRecorder?.delegate = self
        audioRecorder?.record()
    }

    func stopRecording() {
        audioRecorder?.stop()
        audioRecorder = nil
    }

    func deleteAudio() {
        try? FileManager.default.removeItem(at: audioFileURL)
    }

    func getAudioData() -> Data? {
        return try? Data(contentsOf: audioFileURL)
    }
}

extension AudioRecorderManager: AVAudioRecorderDelegate {
    func audioRecorderDidFinishRecording(_ recorder: AVAudioRecorder, successfully flag: Bool) {
        if flag {
            delegate?.didFinishRecording(audioURL: recorder.url)
        } else {
            delegate?.didFailRecording(with: NSError(domain: "AudioRecorder", code: -1, userInfo: [NSLocalizedDescriptionKey: "Recording failed."]))
        }
    }
}
TranscriptionManager
Here’s where the AI comes to function: the transcription process. Using OpenAI’s whisper_1 model via a third-party SDK, manager takes the audio data and converts it into text.
import OpenAI

class TranscriptionManager {
    private let openAI: OpenAI

    init(apiToken: String) {
        self.openAI = OpenAI(configuration: .init(token: apiToken, timeoutInterval: 700))
    }

    func transcribe(audioData: Data, completion: @escaping (Result<String, Error>) -> Void) {
        let query = AudioTranscriptionQuery(
            file: audioData,
            fileType: .m4a,
            model: .whisper_1,
            prompt: "Add someting here"
        )

        openAI.audioTranscriptions(query: query) { result in
            DispatchQueue.main.async {
                switch result {
                case .success(let transcriptionResult):
                    completion(.success(transcriptionResult.text))
                case .failure(let error):
                    completion(.failure(error))
                }
            }
        }
    }
}
One of the standout features of this setup is its flexibility. While making requests to OpenAI, you can include a prompt parameter. This allows for customization, such as filtering out specific words or changing tone of transcription
Bringing It All Together
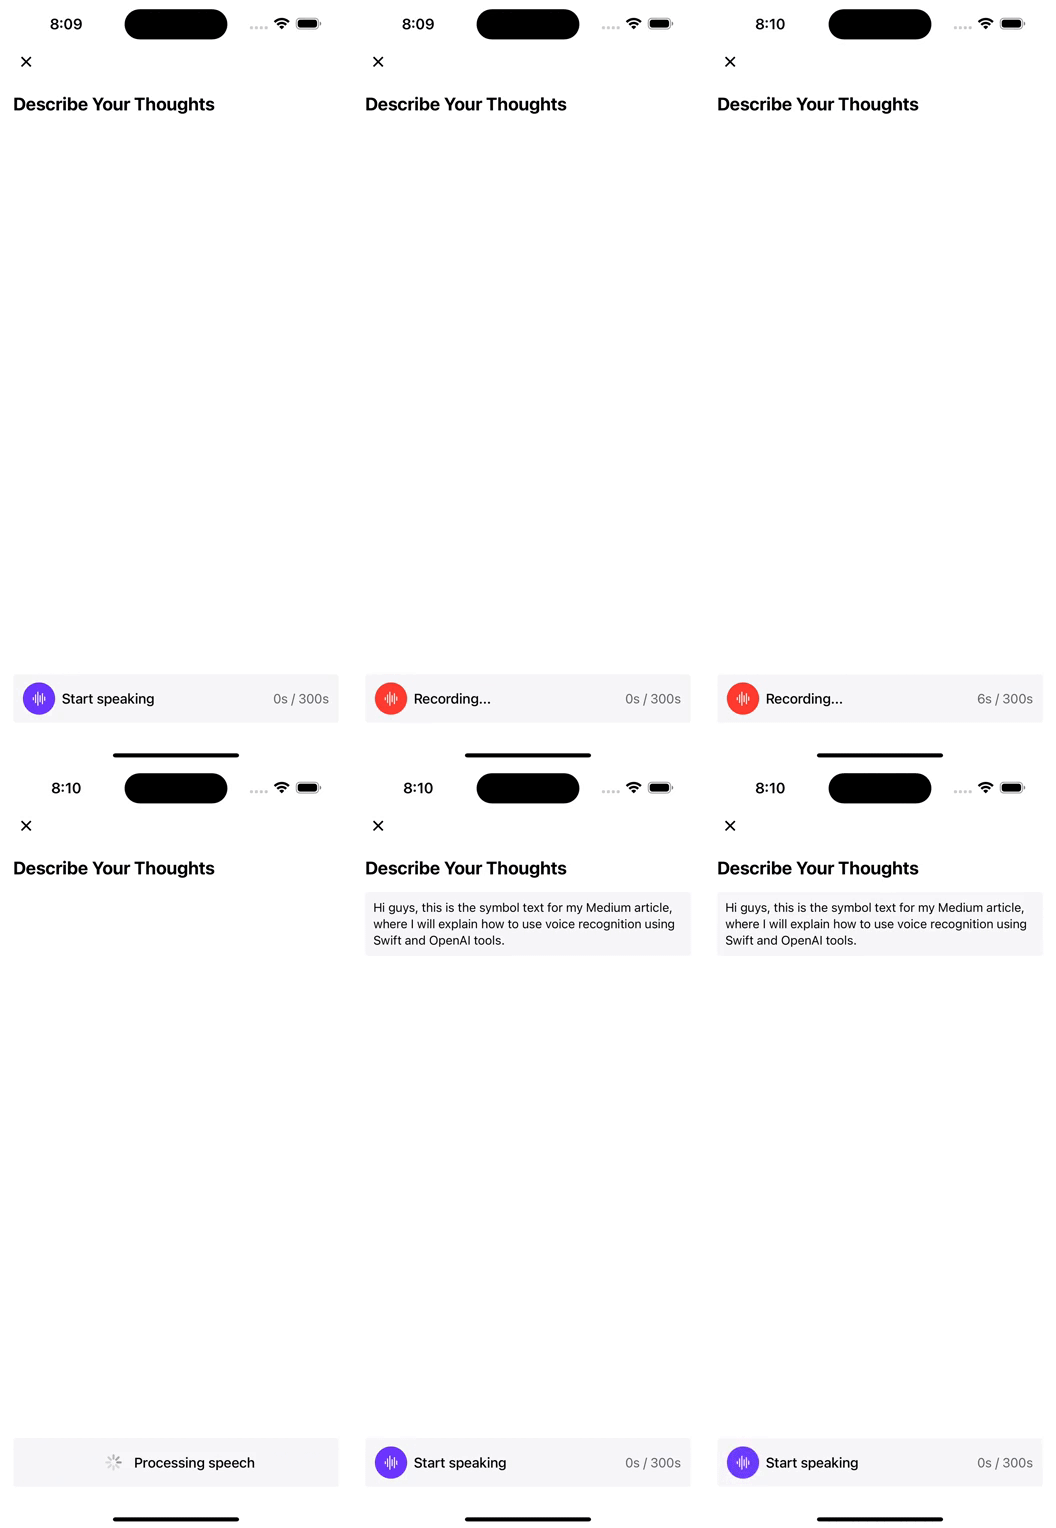
With the foundational modules in place, it’s time to combine them into a cohesive system. Let’s create a simple SwiftUI view to showcase the results.
In this view, we’ll utilize @StateObject and @ObservedObject to share data between the managers and the UI. This structure not only ensures smooth data flow but also allows real-time updates, giving the user instant feedback.
struct RecipeVoiceEntryView: View {
    @StateObject var speechManager = SpeechManager(audioRecorder: AudioRecorderManager(), transcriptionManager: TranscriptionManager(apiToken: "YOUR_API_TOKEN"))
    @State private var isRecording = false
    var onSubmit: () -> Void
    var body: some View {
        ScrollView {
            VStack(alignment: .leading, spacing: 16) {
                Text("Describe Your Thoughts")
                    .font(.system(.title2, weight: .bold))

                if !speechManager.transcription.isEmpty {
                    VStack(alignment: .leading, spacing: 16) {
                        Text(speechManager.transcription)
                            .font(.system(.subheadline, weight: .regular))
                            .multilineTextAlignment(.leading)
                    }
                    .padding(10)
                    .frameWidth(.infiniteWidth, alignment: .leading)
                    .background(Color.surfaceGray)
                    .cornerRadius(4)
                    .transition(.move(edge: .bottom).combined(with: .opacity)) // Transition effect
                    .animation(.easeInOut, value: speechManager.transcription)
                }
            }
            .padding([.horizontal, .top], 16)
        }
        .safeAreaInset(edge: .bottom) {
            SpeechRecorderView(speechManager: speechManager) {
                onSubmit()
            }
            .padding(16)
        }
    }
}
Implementing OpenAI tools without a hustle in Swift opens up a world of possibilities for your mobile apps. By structuring your code with modular managers and leveraging OpenAI’s robust transcription capabilities, you can create powerful and flexible tools that elevate user experiences.
In the next part of this series, I’ll explore even more ways to harness AI, turning user input into sophisticated data models like graphs or visual structures. Stay tuned — the possibilities are endless!


